Receiving stock hearing aids
Bridget Fritzke
Larissa Boecker (Unlicensed)
Receiving stock hearing aids
- Locate the stock order by doing one of the following:
- Click the Inventory drop-down menu, click Manage Inventory, and click the Stock orders tab.
- Click ORDERS on the main toolbar, and click the Stock orders tab.
- Click on the desired order.
Receive the stock aid(s) by doing one of the following:
Right-click the order and select Receive stock or Receive stock with bill.
- Click SCAN PACKAGE, select Without bill or With bill, and scan the barcode affixed to the purchase order form.
Receiving stock without bill
In the Receive stock screen, on the Order details tab, click in the Quantity receiving field, and use the up and down arrows to adjust accordingly.
The Quantity receiving field allows for a partial receipt. The remaining hearing aids can be received at a later time.To save the changes, click out of the cell, or click Enter on the keyboard.
Click NEXT.
On the Item details tab, click in the Serial field to enter the serial number.
Optionally, click the Location drop-down menu to adjust the stock location, click in the Battery field to select the battery size from the drop-down menu, click in the Return date field to select the desired date from the calendar, click in the Color field to designate the color, and click in the Notes field to enter additional information.
- To save the changes, click out of the cell, or click Enter on the keyboard.
Click Save.
The SCAN SERIAL#(S) button will automatically generate the serial number, if the aid package is scanned using a barcode reader. Click Ok when done performing the scan.The received aids appear with 'In stock' status on the Inventory tab, found by clicking the Inventory drop-down menu, selecting Manage Inventory, and clicking the Inventory tab.
Receiving stock with bill
QuickBooks
Receiving aids with a bill will transfer a manufacturer bill to the Vender center in QuickBooks.
In the Receive stock screen, on the Order details tab, click in the Quantity receiving field, and use the up and down arrows to adjust accordingly.
The Quantity receiving field allows for a partial receipt. The remaining hearing aids can be received at a later time.
- To save the changes, click out of the cell, or click Enter on the keyboard.
- Click NEXT.
- On the Item details tab, enter the Invoice # from the manufacturer. Optionally, click the Location drop-down menu to adjust the location, and click the Invoice date field to select the desired date from the calendar.

Click in the Serial field to enter the serial number.
The SCAN SERIAL#(S) button will automatically generate the serial number, if the aid package is scanned using a barcode reader. Click Ok when done performing the scan.Optionally, click in the Battery field to select the battery size from the drop-down menu, click in the Cost field to adjust the manufacturer price, click in the Return date field to adjust the date from the calendar, click in the Color field to designate the color, and click in the Notes field to enter additional information.
The default cost (manufacturer price) for the aid can be adjusted in the Setup menu. See: Setting up hearing aids and options for more information.- To save the changes, click out of the cell, or click Enter on the keyboard.
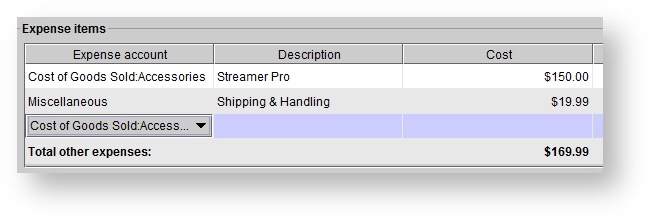
Optionally, add additional expense items by clicking in the Expense account field, within the Expense items panel, and selecting an account from the drop-down menu. Click in the Description field to type an item description. Click in the Cost field to enter item cost. To save the changes, click out of the cell, or click Enter on the keyboard.

Add more than one expense item, by clicking into another Expense account field.
Click Save.
-
Page:
-
Page:
-
Page:
-
Page:
-
Page:
-
Page:
-
Page:
-
Page:
-
Page:
-
Page:
-
Page:
-
Page:
-
Page:
-
Page:
-
Page: