Creating online form templates: Word
- Lauren Ipsum (Unlicensed)
Note: it is much easier to create an online form template using Adobe Acrobat.
For more information, see: Creating PDF form templates and Creating online form templates: PDF.
Overview
This page lists the rules for adding online forms capability to an existing .doc form template.
There will be four types of changes to make:
- Adding properties to an editable text field, to associate the input with an online-form-updatable field in Blueprint OMS
- Enforcing input format validation for editable text fields
- Creating checkboxes and dropdown menus that correspond to online-form-updatable fields in Blueprint OMS
- Setting text fields, checkboxes, radio groups, dropdown menus, and eSignature fields as required fields on the form, as needed
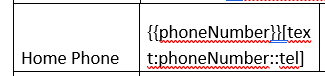
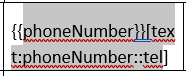
General format for a text-type editable field: {{merge field name}}[field type:merge field name:required or not required:validation type]
To define an editable field, type the field specification into a table cell. The table cell will become the container of the field.
| Example of an editable text field for a non-online form template, made using Microsoft Word | Examples of an editable, online-form-updatable text field for an online form template, made using Microsoft Word | Notes |
|---|---|---|
| {{patientBirthdate}}[fd] | {{patientBirthdate}}[fd] | The same field specification will work in an online form to populate the existing date of birth and to make the field editable. The [fd] designation for an editable field will work in an online form. |
| {{patientBirthdate}}[text] | The more intuitive [text] designation for a single-line field does the same thing as [fd]. | |
| {{patientBirthdate}}[text:patientBirthdate] | Additionally, the field's input will be used to update (or set for the first time) the patient's date of birth. | |
| {{patientBirthdate}}[text:patientBirthdate::date] | Additionally, the field will only accept a date as an input. | |
| {{patientBirthdate}}[text:patientBirthdate:req:date] | Additionally, this field will require an input from the form's recipient. |
Here are some examples of ways to define text fields on an online form. All the examples below have a field type because a field type is required for defining a field on an online form.
| Merge field | Required | Validation | Example for a single-line text field | Notes |
|---|---|---|---|---|
| {{patientBirthdate}}[text:patientBirthdate:req:date] | The part in braces, {{patientBirthdate}}, populates the existing patientBirthdate value for the patient. The part in brackets turns the table cell into an editable text field that: identifies the input as the patient's date of birth, requires an input, and forces the input to be a date. | |||
| {{patientGivenName}}[text:patientGivenName:req] | Within the brackets, everything after "req" is omitted, as, by default, there is no validation for the field. | |||
| {{patientAltContactPostalCode}}[text:patientAltContactPostalCode::zip] | The "nonreq" designation can be omitted, as, by default, fields are not required. | |||
| {{insuredEmployerSchoolName}}[text:insuredEmployerSchoolName] | Within the brackets, everything after the merge field name is omitted, as, by default, fields are not required and have no validation. | |||
| [text::req:date] | Within the brackets, the slot for the merge field name must be left empty. | |||
| [text::req] | Within the brackets, the slot for the merge field name must be left empty, and everything after "req" is omitted, as, by default, there is no validation for the field. | |||
| [text:::date] | The slot for the merge field name must be left empty. The "nonreq" designation can be omitted, as, by default, fields are not required; this results in another empty slot. | |||
| [text] | Within the brackets, everything after the field type is omitted, as, by default, no merge field is used, the field is not required, and there is no validation for the field. |
Controlling table cell sizes by hiding text
The text in the braces and brackets can take up a lot of space and affect the size of your table cells. You can control the size of your table cells by hiding some of the text that defines the field. To do this, highlight the text you want to hide, hit Ctrl+D to open the Font dialog, and select Hidden.
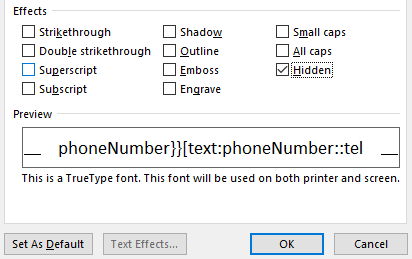

Leave the brackets unhidden so that someone editing the form in the future will know that there is hidden text in the cell.
You can show and re-hide the hidden text by hitting Ctrl+Shift+8.
Fonts
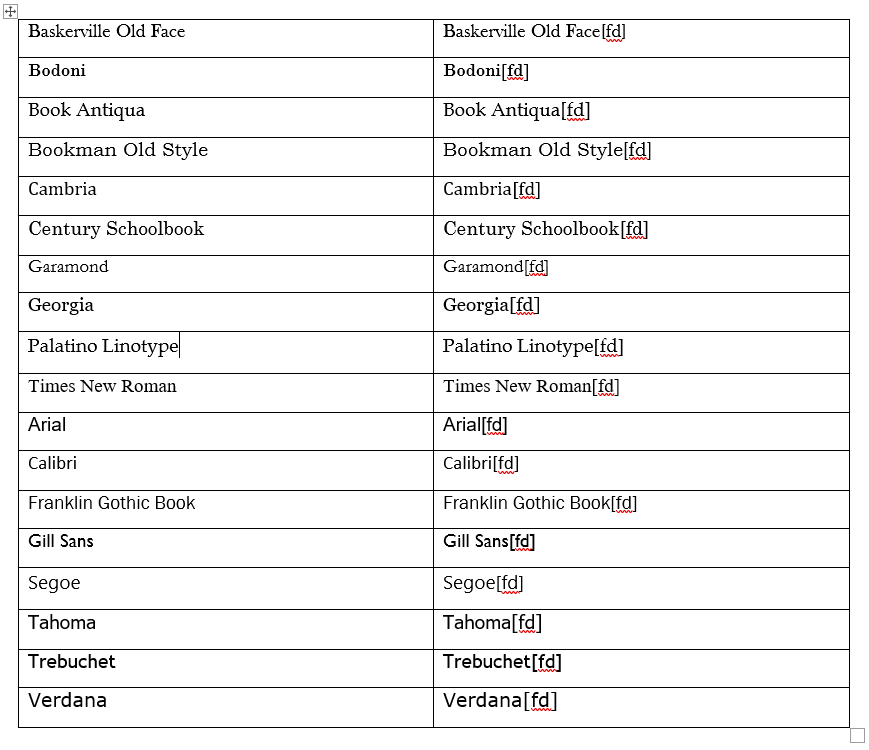
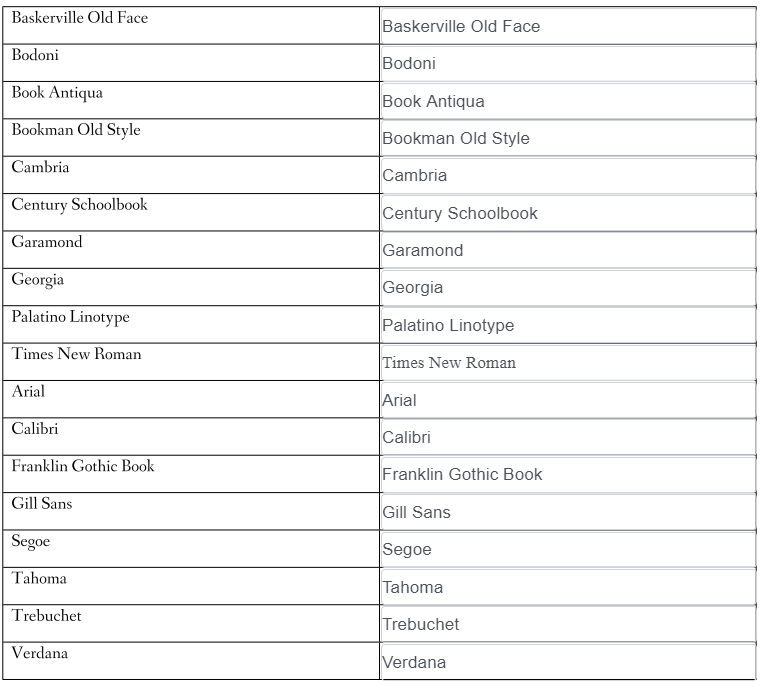
When online form are generated, the static text will appear in Fanwood TT Regular, a font similar to Garamond, no matter what font was used in the templates. The text in editable fields will appear in Times New Roman if the font was set to Times New Roman; otherwise, the text in editable fields will appear in Arial.
The first picture is a screenshot of the Microsoft Word template of various fonts as static text and in editable fields. The second picture is a screenshot of an only form based on this template; in it, the static text appears in Fanwood TT Regular, a font similar to Garamond, and the text in the editable fields appears in Arial, except when it is set to Times New Roman, in which case it appears in Times New Roman.
Part 1: field type
While parts 2, 3, and 4 are optional, a field type is always required to define an editable field.
Single-line text field: text


Backward compatibility with [fd] and [fde]
If you have an existing Word template with [fd] or [fde] fields, then, if you set the template as an online form template, those fields will also be editable, single-line text fields in the online form.
Multi-line text field with text snippet capability: textarea

Backward compatibility with [fdm]
If you have an existing Word template with [fdm] fields, then, if you set the template as an online form template, those fields will also be editable, multi-line text fields in the online form.
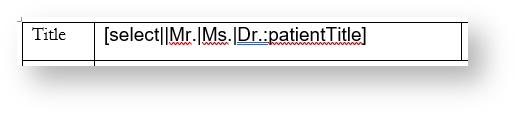
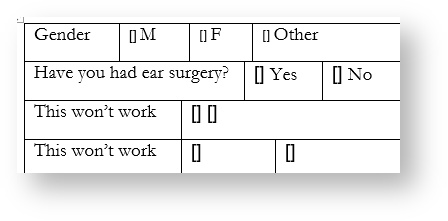
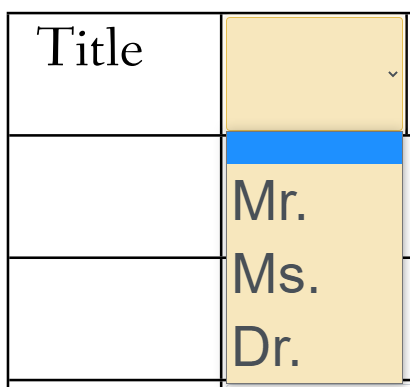
Drop-down menu: select|value1|value2...
At least one value is required.
Hide text
To control the size of the of the table cells, it can be useful to hide some text. To do this, select the text you wish to hide, hit Ctrl+D to open the Font dialog, and select Hidden.
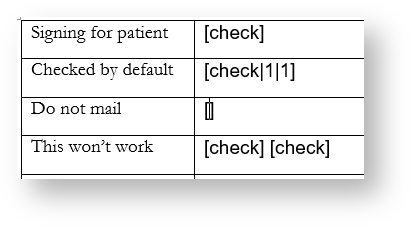
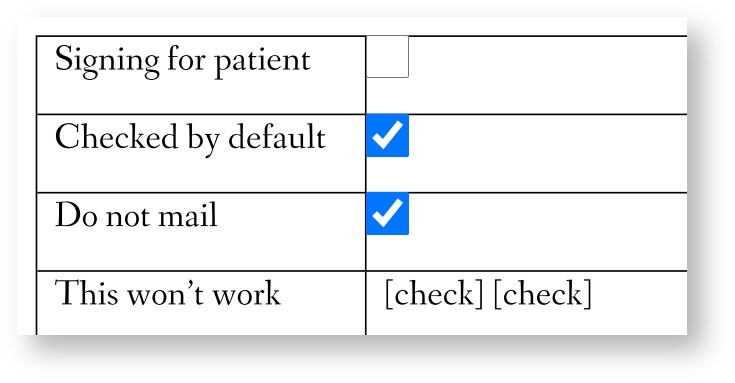
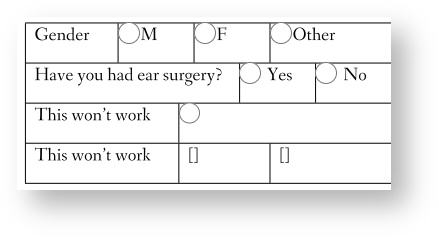
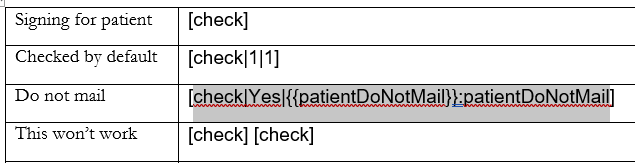
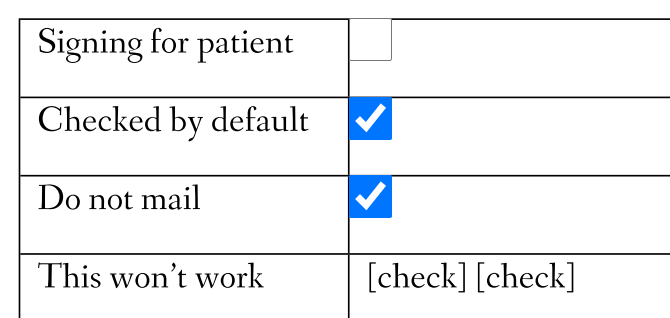
Checkbox: check|value|current value
The "value" and "current value" slots are optional. The checkbox is checked when the "value" and "current value" are the same. You can use a merge field here. No more than one checkbox can go in a table cell.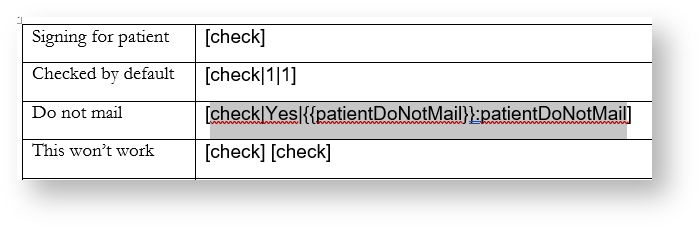
Backward compatibility with legacy tools checkbox
The checkbox legacy tool will also work on online forms, but the [check] field type is more versatile because it can be checked by default under certain conditions, it can feed information to the patient's file, and it can be made required.
Hide text
To control the size of the of the table cells, it can be useful to hide some text. To do this, select the text you wish to hide, hit Ctrl+D to open the Font dialog, and select Hidden.
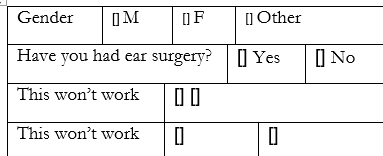
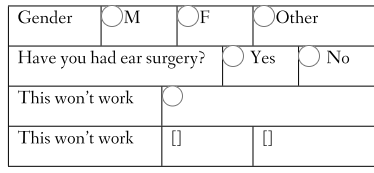
Radio button: radio|group|value|current value
The "current value" slot is optional. On the online form, the radio button will be selected when the "value" and "current value" slots populate with the same information. You can use a merge field as the current value. No more than one radio option can go in a table cell.

Hide text
To control the size of the of the table cells, it can be useful to hide some text. To do this, select the text you wish to hide, hit Ctrl+D to open the Font dialog, and select Hidden.
Electronic signature: sig
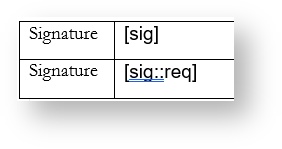
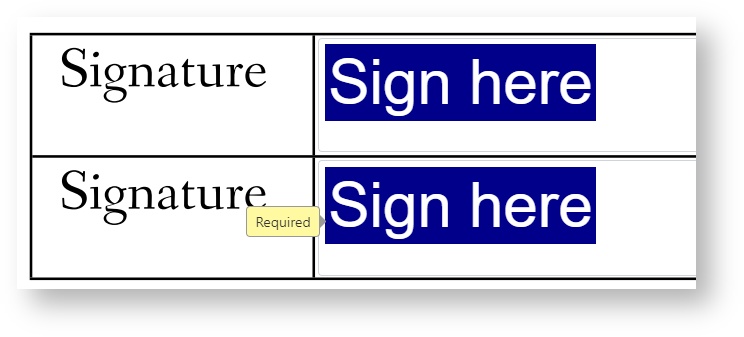
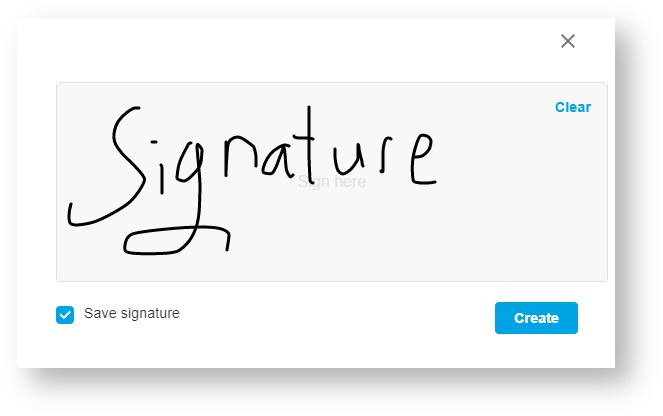
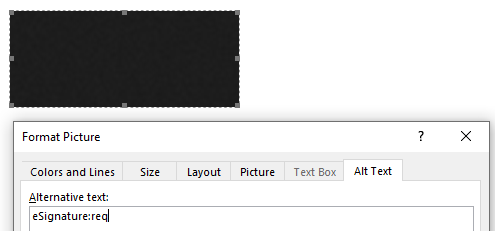
Backward compatibility with eSignature pictures
Pictures containing "eSignature" in the alt text will work as signature fields in online forms. To make one of these fields required, add ":req" after "eSignature" in the alt text.
Naming signature fields
For Word templates for online forms, there is no need to give the signature fields different names.
Part 2: merge field name
For the second part of the field name, after the first colon, enter the name of the merge field that the input data should be mapped to.You can find the full list of available merge fields at the template tool on the Blueprint Solutions website.
Updatable fields
The following merge fields can be used to create or update patient files. The other merge fields will display existing data, but cannot be overwritten and used to create or update patient files.
Creating a new patient, alternate contact, or patient insurer, from an online form
If a form is intended to create a new patient, a new alternate contact for a patient, or a new insurer for a patient, then the form should ask for all the same information that is required when a user is creating the same thing in Blueprint OMS. When the form is uploaded to Blueprint OMS, be sure to give it the Processing required property.
Using merge fields with checkboxes
Some merge fields can have only "Yes" or "No" as values when instantiated as text fields. These fields can also work as checkboxes; to set this up, just follow the naming rules, entering "Yes" or "No" as the "value," and a merge field name enclosed in braces as the "current value."
Example: [check|Yes|{{patientDoNotMail}}:patientDoNotMail]
Backward compatibility with legacy tools checkbox
The checkbox legacy tool will also work on online forms, but the [check] field type is more versatile because it can be checked by default under certain conditions, it can feed information to the patient's file, and it can be made required.
Hide text
To control the size of the of the table cells, it can be useful to hide some text. To do this, select the text you wish to hide, hit Ctrl+D to open the Font dialog, and select Hidden.
Using merge fields with radio buttons
Some merge fields, such as patientGenderAbbreviation, work best as radio groups. To set this up for a radio group, just allow the naming rules, setting the "group" slots as the merge field name, the "value" slots as the different possible values of that merge field (M, F, and U, for patientGenderAbbreviation), and setting the "current value" slots to the merge field name enclosed in braces. The form will select the radio option associated with the group's value for the patient, if one exists, and the person filling out the form can interact with the radio group as needed.

Hide text
To control the size of the of the table cells, it can be useful to hide some text. To do this, select the text you wish to hide, hit Ctrl+D to open the Font dialog, and select Hidden.
Note: for radio buttons, the merge field name goes in the "group" slot, after "radio|" and the merge field name slot (after the first colon) is ignored.
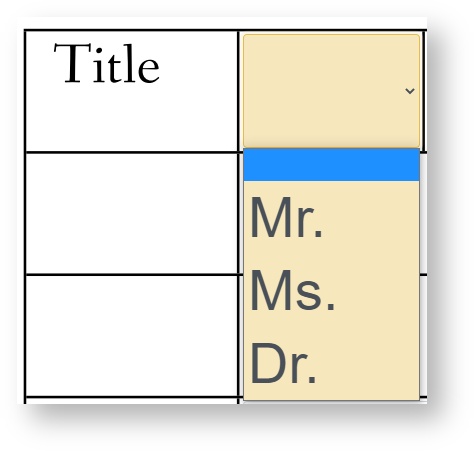
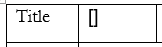
Using merge fields with drop-down menus
Some merge fields, such as patientTitle, work best as drop-down menus; this way, the patient will be able to choose from a specified list of options. To set this up, follow the naming rules, putting some or all of the existing options in the "value" slots, and putting the merge field name in the merge field slot.

Hide text
To control the size of the of the table cells, it can be useful to hide some text. To do this, select the text you wish to hide, hit Ctrl+D to open the Font dialog, and select Hidden.
Part 3: req or nonreq
For the third part of the field name, after the second colon, "req" to make the field a required field, or "nonreq" (or alternatively, nothing, since "nonreq" is the default) to not make the field a required field.
Non-text fields such as checkboxes, radio groups, and drop-down menus can also be made required using the "req" designation.
Whether or not the form has Processing required set, fields can be required. The Processing required property is set, then the field data can be used to create or update a patient file in Blueprint OMS. Even if a form is not intended to create or update a patient file, certain fields, such as a signature or a radio group, might be required because of the nature and purpose of the form.
For more information, see: Special properties of online forms.
Creating a new patient file
To create a new patient file from an online form, the same fields will be required as when you create a patient file using the Add patient button in the patient browser. That means, if you are working on a form that is meant to create new patient files, it should require all the same fields that are required in your system for the creation of a new patient.
In particular, your form should have a required field to capture the patient's referral source. Referral source is not an updatable field because there is only supposed to be a finite list of referral sources, with specific names, and the scheme of referral sources is more for internal use. This means that, when the form is received back into Blueprint OMS after a prospective patient fills it out, the user who clicks to process the form will have to view the form and select the referral source out of the clinic's existing scheme that best matches what the patient had put down.
For more information, see: Handling incoming forms: Create patient wizard.
Creating alternate contacts and adding patient insurers
While certain fields are required for creating new alternate contacts and for adding insurers to patient files, if those fields are set to be required on a form, then the recipient will not be able to submit the form without completing them. If a form is meant to allow patients to proceed even if they do not have alternate contacts or insurers, then the normally required fields for adding alternate contacts and insurers, should not be required on the form.
Part 4: validation
For the fourth part of the field name, after the third colon, enter the type of validation that will be enforced by the field. This third part only applies to text fields and can be omitted for other types of form fields and for text fields that don't require any specific format for the input.
Here are the options you can enter:
date, optionally date(format)
Enforcing a date format
If no format is used, the system's default date format will be used.
To enforce a format, use the following designators, as well as any other characters:
- d for numeric day of the month, with no leading zero
- dd for numeric day of the month, with a leading zero
- m for numeric month, with no leading zero
- mm for numeric month, with a leading zero
- yy for the last two digits of the year
- yyyy for all four digits of the year
Example
The m/d/yy format can populate a date like 2/3/99, for February 3rd, 1999.
- tel
- zip
- postal
letters_only, optionally letters_only(min length|max length)
Example: middle initial
Setting the min length and the max length to 1 allows only one letter to be entered as the field's input.
This could be used for a middle initial field: {{patientInitial}}[text:patientInitial::letters_only(1|1)].
numbers_only, optionally numbers_only(min length|max length)
Example: certain health card numbers
In British Columbia, the Personal Health Number is ten digits long.
This could be used for a health card number field in British Columbia: {{patientHealthCard}}[text:patientHealthCard:req:numbers_only(10|10)].
To create custom validation conditions, use the following guide by W3Schools: https://www.w3schools.com/tags/att_input_pattern.asp
Example, certain health card numbers
In Ontario, the health card number is ten digits followed by two letters.
This could be used for a health card number field in Ontario: {{patientHealthCard}}[text:patientHealthCard:req:[0-9]{10}[A-Za-z]{2}].
Validation for forms that require processing
To minimize the amount of manual correction that will have to be done in the Create patient wizard or Update patient wizard by the user who clicks to process an incoming online form, use the same validation types that are normally required when you manually enter patients, alternate contacts, and patient insurers into Blueprint OMS.
Hyphens and apostrophes in names
A letters-only text field for a name will not allow patients with hyphens or apostrophes in their names to enter their names.
Canadian health card numbers
Canadian clinics that operate in different provinces with different health card number formats are best off either not having validation on the intake form's health card number field, or having province-specific online forms that have different validation types on the health card number field.