Overview
When a patient schedules an appointment online, a blue notification badge representing an unverified booking will appear beside the Scheduling option in the main toolbar. Users will then have the option to verify or reject an incoming booking.
| Info |
|---|
In Blueprint OMS terminology, to verify a booking is to verify that the online booking was a genuine attempt by the person behind the given email address or phone number to book an appointment at your clinic. To confirm a booking is to confirm that the desired appointment will happen as the booker requested. Some clinics prefer to leave appointments unconfirmed until a few days before the appointment, so they can use the tentative and confirmed statuses as a to-do list for confirmation calls. When an incoming booking is verified, it remains in tentative status so that it can be confirmed later. |
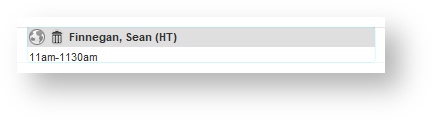
Any appointment scheduled online will be displayed with a globe icon next to the patient name.
![]() The gray globe icon indicates that the appointment is unverified.
The gray globe icon indicates that the appointment is unverified.
![]() The black globe icon indicates the appointment is verified. When an unverified appointment is confirmed, it is thereby also verified, and its globe icon turns black.
The black globe icon indicates the appointment is verified. When an unverified appointment is confirmed, it is thereby also verified, and its globe icon turns black.
| Tip | ||
|---|---|---|
| ||
The |
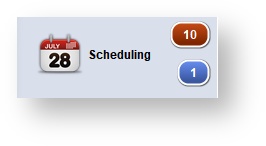
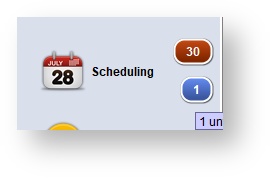
Notification badge of unverified online booking
Once an appointment is requested online, it will display as an unverified appointment on the schedule. This will trigger a blue notification badge beside the Scheduling option in the main toolbar indicating that there is an unverified appointment that requires action.
| Tip |
|---|
The number on the badge indicates the number of unverified appointments in the Needs action panel. |
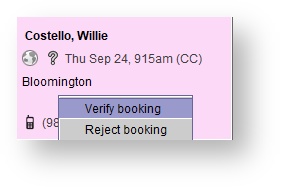
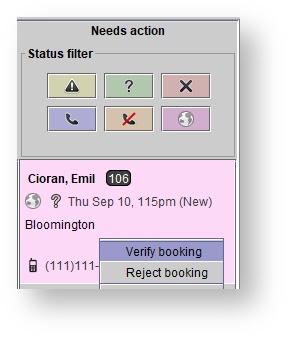
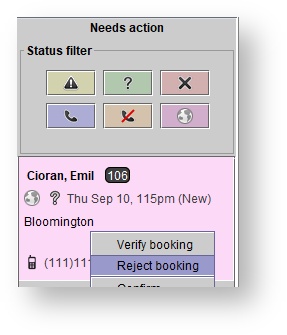
If you click on the blue notification badge, the Needs action panel will open and show details of appointments that require follow-up action.
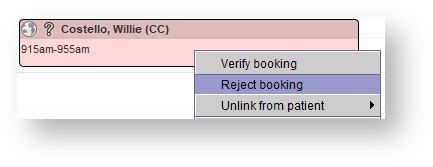
You can then right-click the appointment and Verify booking or Reject booking.
QuickAdd patients
QuickAdds will be created through the online appointment booking feature for new patients. To prevent duplicate QuickAdds, Blueprint OMS will search for an existing patient or QuickAdd to link the booking to, if possible. Matching will be done on the first and last name, and on the email address or telephone number. In the rare case that an online booking is incorrectly linked to a new QuickAdd (instead of an existing QuickAdd or patient, because of a typo or nickname), you can correct this by right-clicking on the appointment and choosing Unlink from patient > Link to a different patient.
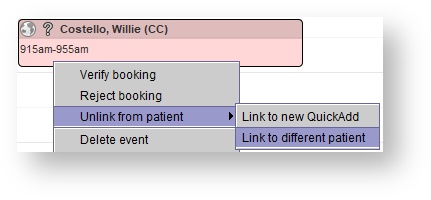
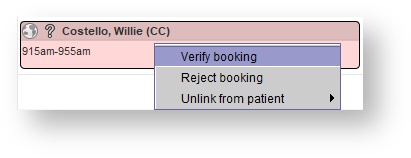
The Unlink from patient option is only available for unverified bookings. Once the booking is marked as verified (which should be done when a user has verified the authenticity of the request), the option is removed.
Verifying a booking
Verifying an appointment is a way of acknowledging that this appointment has been seen by someone in the clinic and they have verified the authenticity of the request. If the location, provider, appointment type, or time needs to be changed, the best thing would be to call the patient and make adjustments by editing the details of the appointment. More information on editing appointment details can be found here.
- To verify a booking, do one of the following:
- Right-click on the appointment on the schedule and select Verify booking.
b. Open the Needs action panel, right-click on the appointment that needs verifying, and select Verify booking.
Once the booking has been verified, the event's globe icon will turn black.
Online forms requests
If the booking is for a QuickAdd, or for a patient who has not yet email-verified the booking, and the requested appointment type is associate with online forms, then your clicking Verify booking may* send the booker an online forms request.
*The forms request won't send if both of the following are true:
- All of the Only required once forms associated with the event type have already been submitted by the patient.
- All of the other forms associated with the event type are currently part of Incomplete forms requests for the patient.
| Tip |
|---|
For more information, see: Online forms, Associating online forms with event types, and Creating an online forms request in connection with an appointment. |
Telehealth appointment invitations
If the booking is for a telehealth-type appointment for a QuickAdd, or a patient who has not yet email-verified the booking, then your clicking Verify booking will send the booker a telehealth appointment invitation email containing instructions for joining the videoconference. If the booking is for a telehealth-type appointment for an existing patient, and the booker has email-verified the booking, then that act of verifying via email will trigger the sending of the telehealth appointment invitation email containing the joining instructions.
| Tip |
|---|
For more information about telehealth appointment invitations, see: Setting up telehealth appointment invitations. |
| Tip |
|---|
At Setup > Scheduling > Event types, users with the Maintain event types user privilege can edit event types to designate them as telehealth event types. |
| Tip |
|---|
Rejecting a booking
You may need to reject a booking is if the incoming appointment was not genuine (e.g., if it was actually just a neighborhood prankster trying to increase your no-show rate). If the location, provider, appointment type, or time needs to be changed, the best thing would be to call the patient and make adjustments by editing the details of the appointment. More information on editing appointment details can be found here.
- To reject a booking, do one of the following:
- Right-click on the appointment on the schedule and select Reject booking.
b. Open the Needs action panel, right-click on the appointment that is being rejected, and select Reject booking.
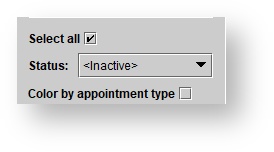
- Rejected appointments will be removed from the <Active> schedule view.
- You can change the schedule view to the <Inactive> status view to see rejected appointments, indicated by a
 icon.
icon.
| Panel | ||||||
|---|---|---|---|---|---|---|
| ||||||
|
| Panel | ||||||||
|---|---|---|---|---|---|---|---|---|
| ||||||||
|