Selling items
To sell items to a patient, do one of the following:
- On the Patient browser tab, open the patient's file.
- On the Patient browser tab, click on the desired patient.
Click the
button on the main toolbar.Status title Sale
Selecting items for sale
The New sale screen opens. On the Order items tab, in the Products & services panel, click the Services, Batteries, or Accessories tab.
Tip To quickly locate the desired item, type the first few letters of the item description in the Quick Find field. Optionally, type in the CPT code into the Quick Find field. (If you would like this CPT code feature enabled please notify Blueprint Solutions) 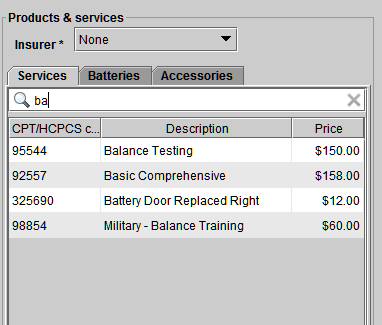
Select one or multiple products or services by double-clicking the items to add them to the sale. The items appear on the Order items tab within the Other products & services panel.
Tip Batteries which match the patient’s hearing aids are highlighted with L and/or R icons, signifying the left and/or right aid respectively.
Removing items from sale
| Anchor | ||||
|---|---|---|---|---|
|
| Note | ||||
|---|---|---|---|---|
If the sale has been completed, click the patient's Sales history tab, click on the desired sale, and click
|
- On the Order items tab, within the Other products & services list, click on the desired item for removal.
Select the X next to the item.

Tip Items can also be removed from the Cost allocation tab, using the X button next to the item.
Selecting the insurer
| Note |
|---|
| If the sale will be paid for by an insurer for which special pricing applies, select the insurer within the Products & services panel. Correct pricing is displayed and used for the sale. If the patient is covered by an insurer, whom normally pays the full amount of all purchases, the insurer will be selected by default. |
On the Order items tab, within the Products & services panel, click the Insurer drop-down menu to select the insurer.
Tip Items with a benefit code and/or special pricing defined for the selected insurer are highlighted with a check mark. Insurer-specific services are highlighted with a star and are only visible when the insurer is selected. See: Setting up insurer coverage for more information. 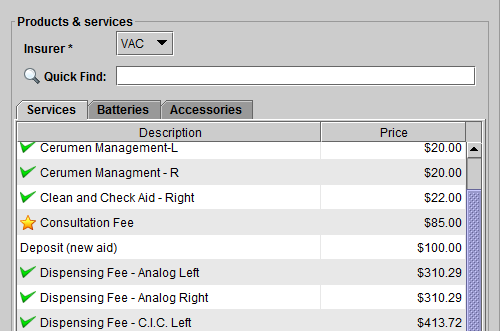
Note If the insurer does not appear in the drop-down menu, enter the policy information in the patient's Insurers tab before continuing with the sale.
Adjusting item quantities
| Anchor | ||||
|---|---|---|---|---|
|
On the Order items tab, within the Other products & services panel, click in the Quantity cell beside the selected item.
Click the up and down arrows to adjust the quantity.

To save the change, click out of the cell, or click Enter on the keyboard.
Note The amount in the Total column is updated to match the Quantity x Unit price values. - Click
.Status title Next
| Tip |
|---|
Item quantities can also be adjusted on the Cost allocation tab. |
Changing order date
| Anchor | ||||
|---|---|---|---|---|
|
| Note |
|---|
| The Order date defaults to the current date. Changing the date of an invoice is associated with the user privilege titled 'Backdate accounting.' See: Setting up roles and users for more information. |
- On the Cost allocation tab, click the Order date field.

- Select a new date from the calendar.
Changing order location
| Anchor | ||||
|---|---|---|---|---|
|
| Tip |
|---|
| The location of the sale defaults to the corresponding location listed in the patient's Details tab. |
- On the Cost allocation tab, click the Location drop-down menu.
- Select the desired location.
Changing order provider
| Anchor | ||||
|---|---|---|---|---|
|
| Note |
|---|
| A provider is required to generate a HCFA 1500 form. |
| Tip |
|---|
| The provider of the sale defaults to corresponding provider listed in the patient's Details tab. |
- On the Cost allocation tab, click the Provider drop-down menu.
- Select the desired provider.
| Note |
|---|
| The list of providers includes all users who have the role Audiologist, Specialist, or Dispenser. See: Setting up roles and users for more information. |
Changing order referral source
| Anchor | ||||
|---|---|---|---|---|
|
- On the Cost allocation tab, click the
 button to select the desired referral type for the order.
 - Use the search bar to narrow down your list.
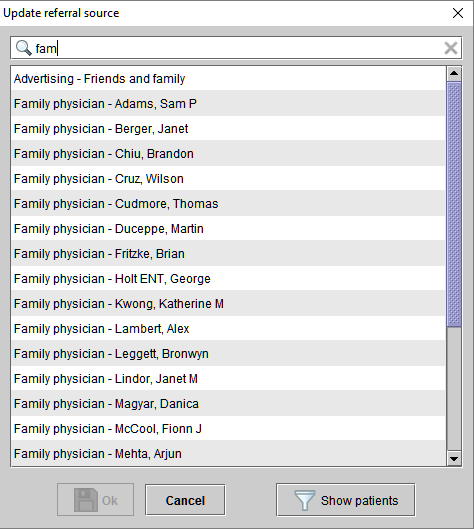
3. Highlight the desired referral source and click  .
.
| Tip |
|---|
Optionally, click on the |
Selecting the invoice template
| Anchor | ||||
|---|---|---|---|---|
|
| Tip |
|---|
| The invoice template can default to a specific template, or the template specified for the patient, if a specified template is selected in the patient's Details tab, within the Alternate contact section. To configure default templates for each insurer, see: Setting up insurers. |
- On the Cost allocation tab, click the Invoice template drop-down menu and select the desired template.
- If selecting a sales receipt template, payment details must be entered upon completing the sale. See: Entering payment details for a sales receipt.
Decreasing item prices
| Anchor | ||||
|---|---|---|---|---|
|
| Tip |
|---|
Default item prices can be adjusted in the Setup menu. |
On the Cost allocation tab, double-click in the Discount cell beside the selected item.
- In the Discount dialog box, click the Reason drop-down menu to select the reason for the discount.
In the Discount field, enter the discount (per unit) in dollar amount or percentage.
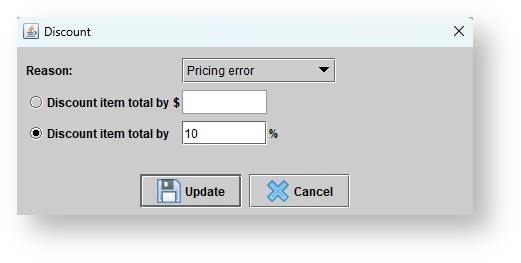
Tip If entering an amount less than one dollar, enter it with a preceding zero, e.g. 0.80. Click
. The discount appears in the Discount cell, and the subtotals and totals are recalculated automatically.Status title Update Note The amount and reason for each discount is tracked for reporting purposes.
Increasing item prices
| Anchor | ||||
|---|---|---|---|---|
|
On the Cost allocation tab, click in the Price cell beside the selected item.
Enter the desired price.
To save the change, click out of the cell, or click Enter on the keyboard. The new price appears in the Price cell, and the subtotals and totals are recalculated automatically.
Allocating costs between the patient and insurers
| Anchor | ||||
|---|---|---|---|---|
|
| Note |
|---|
| The Automatically allocate costs check box is selected by default if one of the patient’s insurers normally pays the full amount of all purchases. See: Setting up insurers for more information. The entire patient payable amount will be automatically allocated to that insurer. Un-check the Automatically allocate costs check box to adjust the allocation. |
On the Cost allocation tab, click in the Covered amount cell beside the desired insurer.
Enter an amount to be covered by an insurer.

To save the change, click out of the cell, or click Enter on the keyboard. The amount shown on the Patient payable line is adjusted automatically.
Entering an authorization or claim number
| Anchor | ||||
|---|---|---|---|---|
|
| Note |
|---|
An amount must be allocated to the insurer prior to an authorization number being saved. |
- On the Cost allocation tab, click in the Authorization No cell beside the desired insurer.
- Enter the desired number.

To save the change, click out of the cell, or click Enter on the keyboard. The authorization number appears in the body of the insurer invoice.
Info title QuickBooks The claim authorization number will also show in the description filed of the insurer invoice in QuickBooks. Note This authorization number will appear in box 23 of the HCFA 1500 form.
Creating quotes
| Anchor | ||||
|---|---|---|---|---|
|
On the Cost allocation tab, click
. If multiple quote templates are active in the system, a dialog will prompt you to choose your desired template. A quote is then displayed for the patient and any insurers.Status title Create quotes - Click the Print icon in the top-left hand to print the quote(s), click
to save to the local computer, or clickStatus title Save as PDF
to save a copy to the patient's Documents tab. Alternatively, use the Email/fax menu to email a copy of the quote to the patient or contact.Status title Archive
Completing the sale
On the Cost allocation tab, click
. An Invoice is display for the patient and any insurers, the transaction appears in the patient’s Sales history tab, and a new journal entry is created to record the sale for the patient.Status title Complete sale Info title QuickBooks Corresponding invoices for the patient and any insurers involved are created in QuickBooks. - Optionally, click the Print icon in the top-left hand to print the invoice(s), click
to enter payment information or apply an available deposit, clickStatus title Receive/apply payment
to apply available return credit, clickStatus title Exchange credit
to save to the local computer, or clickStatus title Save as PDF
to save a copy to the patient's Documents tab.Status title Archive
Entering payment details for a sales receipt
| Anchor | ||||
|---|---|---|---|---|
|
- In the Create sales receipt dialog box, review the Amount received field. It is auto-populated with the patient payable amount.
- Select the Payment method and Check #, if Check is selected as the payment method.
Click
.Status title Complete sale Info title QuickBooks The payment is recorded in QuickBooks and in Blueprint OMS, and the invoice is updated to reflect the amount paid.
| Panel | ||||||
|---|---|---|---|---|---|---|
| ||||||
|
| Panel | ||||||||||||
|---|---|---|---|---|---|---|---|---|---|---|---|---|
| ||||||||||||
|
| Panel | ||||||
|---|---|---|---|---|---|---|
| ||||||