Overview
Recalls, collectively, are a tool to prompt clinic staff to contact patients to follow up about any recommended procedures, treatments, or tests discussed during their last appointment.
Example recalls are:
- You have not seen a patient in the past year
- To follow up with a patient
- A patient's loaned hearing aid is due
- A patient's hearing aid is now 4 years old
- A patient's hearing aid warranty is about to expire
- You simply want to remember to call a specific patient
Viewing the list of recalls
| Anchor | ||||
|---|---|---|---|---|
|
Click the Recalls button on the main toolbar. The Recalls screen shows a list of patients due for recalls along with patient Telephone number, Recall type, Location, Assignee, and Notes.
| Note |
|---|
The red bubble icon next to Recalls |
| Tip |
|---|
The |
Filtering the list of recalls
- Click the Recalls button on the main toolbar.
- On the Recalls screen, do one or more of the following:
- Click on a column name (e.g. Recall date, Patient, Recall type) to sort the list of patients in ascending order. Click the column name again to sort the list of patients in descending order.
- Use the Quick Find field at the top of the screen to type the first few letters of the patient's last name.
- Click the Recall period, Recall type, Recall status, Location and/or Assignee drop-down menus to filter the list of patients.
- Check the Hide booked patients check box at the bottom of the screen to hide patients with upcoming appointments.
Managing time-sensitive or Action Required recalls
| Note |
|---|
Overdue recalls that are NOT marked as "required" will disappear after 60 days. If you would like this featured turned off, please notify us by submitting a support ticket. |
Certain recalls are time-sensitive and must be performed by a specific deadline.
- Click the Recalls button on the main toolbar.
- View the following highlights on the Recalls screen for time-sensitive recalls:
- The Recall date column text turns red if all of the following conditions are true:
- The recall has the 'Required' box checked.
- The recall is due within 7 days or overdue.
- The recall is due within the next 30 days, with no future appointment booked for the patient.
- The Next appt. column text turns red if the recall is time-sensitive, due within the next 30 days, and the next appointment is after the recall date or the 'Required' box is checked.
- Go to the Recall Period filter and choose Action Required to filter for all red color coded recalls.
Managing automatic recalls
Certain recalls generate automatically based on data present in the patient file. Automatic recalls can be removed, or created, upon request.
- Click the Recalls button on the main toolbar.
View automatic recalls generating within the US system, which include:
Name Recall date Trigger Trigger for removal 30-day post-fitting 30 days from the invoice date Hearing aid invoice billed Manual removal HA 4 years old 4 years from the invoice date Hearing aid invoice billed Manual removal or new aid invoice billed HA Warranty Expiry Aid warranty expiry date Aid expiring in the next 30 days Manual removal Loaned aid due Loaned aid due date Aid with On loan status Loaned aid returned or sold Not seen in past year Current date Patients who have not had an appointment scheduled in over a year Manual removal or new appointment booked View automatic recalls generating within the Canadian system, which include:
Name Recall date Trigger Trigger for removal VAC 2yr Hearing Assessment 2 years from the invoice date Hearing aid invoice billed to VAC Service with code 320625 or 328370 billed WSIB Service Block 2 (2016 POC) 90 days from the invoice date Hearing aid invoice billed to WSIB (on or after August 15, 2016) Service with code NIHL2L or NIHL2R billed WSIB Service Block 1 - old 30 days from the invoice date Hearing aid invoice billed to WSIB (before August 15, 2016) Service with code NIHLB1L or NIHLB1R billed WSIB Service Block 2 - old 60 days from the invoice date Hearing aid invoice billed to WSIB (before August 15, 2016) Service with code NIHLB2L or NIHLB2R billed
| Tip |
|---|
| For more information on setting up codes to generate Canadian-specific recalls, see: Setting up insurer coverage for items. |
Managing Overdue recalls
To view overdue recalls do one of the following:
Click on the Recalls button on the main toolbar. On the Recalls screen filter by Recall period Overdue.
Click on My Recalls to see recalls assigned to you and filter by Recall Period Overdue.
- To complete or cancel an overdue recall right-click the recall line item, and click Complete/Cancel.
- Within the Edit Recall dialog box, select an Outcome for the completion/cancellation. Select Appointment Booked/Completed or Client Cancelled and click Ok. The recall will be removed from the screen.
Adding recalls
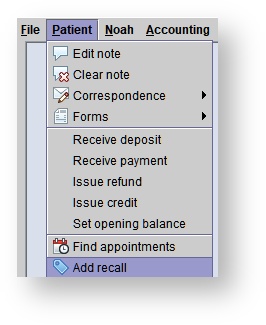
- To add a recall, do one of the following:
Click the Recalls button on the main toolbar. On the Recalls screen, click the
button. Within the Select patients dialog box, select the desired patient, and click Ok.Status title Add recall Tip To quickly locate the patient, type the first few letters of the patient's last name. - On the Patient browser tab, click on the desired patient, click the Patient drop-down menu, and select Add recall.
In the Add recall dialog box, click in the Recall date field to select a date,select the Recall Type from the drop down menu, choose an Assignee for the recall and add any notes to the recall.
Note Recall Types can be added/edit under the setup menu. Optionally check the 'Required' box to flag a recall as Action Required.
Click Ok.
Changing recall statuses
- Click on the Recalls button on the main toolbar.
- On the Recalls screen, click on the desired recall line item.
- Right-click the recall line item, and select Edit.
- In the Edit recall dialog box, change the recall status in the Recall status drop-down menu.
- Click
.Status title Update
Completing/cancelling recalls
- Click the Recalls button on the main toolbar.
- On the Recalls screen, click on the desired recall line item.
- Right-click the recall line item, and select Complete/Cancel.
Within the Edit recall dialog box, select an Outcome for the completion/cancellation. Select Appointment Booked/Completed or Client Cancelled and click Ok. The recall will be removed from the screen.
Tip To complete several recalls at once, press and hold the Control key (Ctrl) on the keyboard while clicking the desired recalls. Right-click an Outcome for the completion/cancellation, and click Ok.
Postponing recalls
- Click the Recalls button on the main toolbar.
- On the Recalls screen, click on a desired recall line item.
- Right-click the recall line item, click Edit, click the
 icon select a new recall date, and click Ok.
| Note |
|---|
| Required recalls, such as Loaned aid due, cannot be completed, cancelled, or postponed. This recall is automatically completed once the loaned aid is sold or returned to stock. See: Selling stock hearing aids or Returning loaned aids to stock for more information. |
Viewing patient details
- Click the Recalls button on the main toolbar.
- On the Recalls screen, click on a desired recall line item.
- Click the
button to open the patient’s file.Status title Patient details
Booking an appointment or viewing the details of an existing appointment
| Anchor | ||||
|---|---|---|---|---|
|
- Click the Recalls button on the main toolbar.
- On the Recalls screen, click on a desired recall line item.
- Right-click the recall line item, and do one of the following:
- Click Book appointment. For more information, see: Creating appointments.
- Click Appointment details. For more information, see: Searching for appointments.
| Panel | ||||||
|---|---|---|---|---|---|---|
| ||||||
|
| Panel | ||||||||||||
|---|---|---|---|---|---|---|---|---|---|---|---|---|
| ||||||||||||
|
| Panel | ||||||
|---|---|---|---|---|---|---|
| ||||||
|